Saturday 25 August 2012

Transmaterial- SRW Weave

We decided to try weaving together seaweed and rice paper in order to make them slightly stronger than they were on their own. This was a rather time consuming (as we had to be careful not to break the pieces as we were weaving them) yet rewarding experience. However, once we completed the weave we found that although this was stronger than the pieces had been individually, it was still quite brittle and there was nothing to hold the weave in place. Therefore we decided to create a binding backing for it with glue.
Since this is a very lightweight material we feel that it gives us many opportunities to incorporate into one or both of our vehicles.


Thursday 23 August 2012

Lantern modification 1


One of the main issues we found with our prior experience of the lantern, which was confirmed by hearing feedback from the other groups, was that the lantern tilting caused it to combust. Therefore we thought of including tails to the lantern, similar to the tails on a kite which act as stabilisers. We thought that this would have the double purpose of stabilising and also making the lantern appear like a giant, floating jellyfish.


We decided to change the lantern to red for aesthetic purposes- the red of the lantern and the green of the seaweed complement each other. We also decided to try stitching the seaweed to the lantern instead of using tape; this should give it a stronger hold.

Here is a video of our lantern flying attempt. Unfortunately I was away the first week and the weather the second week was rather unacceptable for flying a lantern. I did try to light it a few days, but the first time it didn't work and the second time I got told off... ^^; Therefore, since it has been very windy I decided to test whether the lantern would work using wind as it's uplift force. This does work, however of course wind is renewable and a very changeable force. Hopefully I will be able to find a day and place where it will be suitable to light it soon.


Monday 20 August 2012

First Lantern Flight Attempt


This is probably the most disastrous experience that Studio L.I.M. has had so far! We learnt that even a tiny breeze (we purposefully moved to the sheltered car park, not only for fire safety reasons but also for protection from the wind) can really affect the way the lantern blows and the difficulty in getting a flame to start. We found that paraffin burns very effectively once going, but that it is quite difficult to start it off. Our lantern did fly briefly, although as demonstrated in the video it quickly got out of hand as a sudden gust of wind blew the lantern sideways (into me!) We were very happy that we had decided to tie a string to it before lighting the paraffin, as not doing this would have been very dangerous as it would have flown away and possibly set something else alight. We have learnt that as the lantern currently is, it needs to be lit under very controlled conditions, on a completely calm day. Safety first! Here are some photos of our experience: 


We had some volunteers from other teams helping us. We'd like to thank them for this.

The victim: there's now a hole in my skirt where a bit of ash fell on it! Thank goodness it wasn't anything more!

The culprit: our sadly burnt out lantern. Fortunately, on the advice of our tutors earlier in the day, we bought more than one so have spares sitting in our lockers for later attempts.


Friday 17 August 2012

Organic inspired architecture

For our island inspired hotel, we have been looking at organic inspired architecture.


OMA Architecture

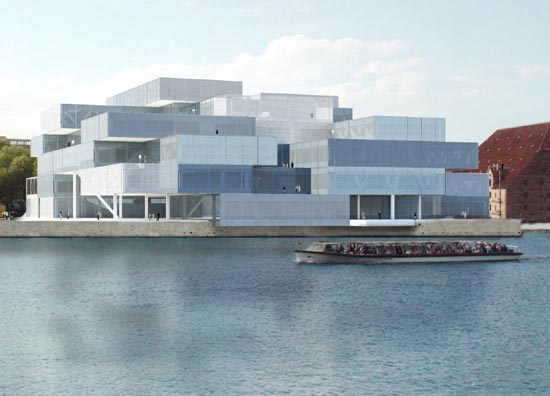
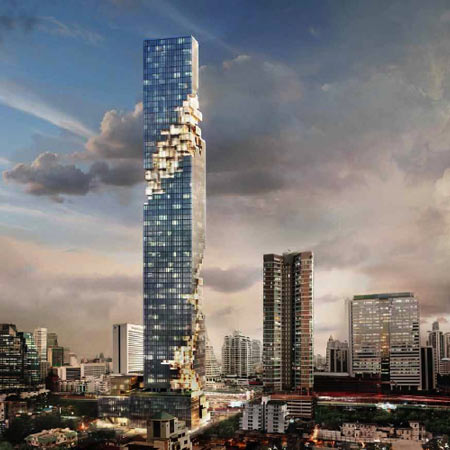
We have been looking at OMA (Office for Metropolitan Architecture) architecture for inspiration for our city inspired hotel. We want to use strong rectilinear shapes and have a sense of verticality. A lot of OMA's work includes such concepts, so we believed that looking at their work would be a good place to start.

Here are some other examples of linear architecture. This time, different from OMAs work.


Thursday 16 August 2012

Sunday 12 August 2012

ArchiCAD CNC router files


Here are our ArchiCAD files for the CNC router. This took a really long time, both due to the fact that we're still learning ArchiCAD and because it took us a while to actually understand the CNC router and what it does. We've learnt so much though! Now I really hope our files will be alright though since the group before us had problems with this and we've spent a lot of time on these files so it would be a shame if it didn't work!
For our first design we have made an inverse of the top part of our honeycomb and are intending on casting the individual steps with plaster. None of us have ever casted before, so we're looking forward to try something new!
Although our second design (as seen in the image above) may look like it could be laser cut, it actually can't be since all the pieces are of varying thicknesses and it has some hollow pieces in it where the lighting is supposed to go. 
We're excited to see our CNC cut pieces!


Thursday 9 August 2012

The Rush Hour Steps

An aerial view of the city at night. We want to capture the delicate spidery shape of the roads.

Textures


Here are the textures we ended up getting from around our site on tracing paper by doing rubbings with charcoal.


I really liked the geometric nature of these textures, found on the ground near a pedestrian crossing.

We ended up using this for our city site hotel. Our city site hotel was quite open and its walls have many lines going in different directions, so we thought that this texture would accompany the overall feel of our structure quite well.

This was the texture we decided to incorporate on the interior of our Island site hotel. The island site hotel is all about deception of sorts, with the inside being different than what would be expected from viewing the exterior. Since the interior is all about curves, we thought that this texture would be perfect, since it has a kind of dizzying, almost spiral aspect to it.

A brick texture

A tree bark texture

We've kept copies of all the other textures we didn't use, since not only do we like them, but they may come in handy in the future.

Plant room pieces


Just some photos of our plant rooms as we were constructing them.